script 태그
자바 스크립트는 html 위에서 동작하는 언어다. 자바 스크립트를 html 안에 작성하기 위해서는 script 태그를 사용하는 방법이 있다.
 <!DOCTYPE html>
<html lang="en">
<head>
    <meta charset="UTF-8">
    <title></title>
</head>
<body>
    <script>
        document.write("Hello");
    </script>
</body>
</html>
Event
웹 브라우저 위에서 일어나는 사건을 Event(이벤트)라고 한다. 마우스를 클릭했을때, 키보드를 눌렀을때, 스크롤 바를 움직였을때 등 모두 이벤트라고 할 수 있다. 사용자가 어떤 이벤트를 발생시켰을 해당 이벤트에 대응하여 처리하는 것을 'Event Handler(이벤트 핸들러)'라고 하는데, 이벤트 이름 앞에 'on'을 붙이고 이벤트에 대한 동작(함수)을 처리해주면 된다. 아래 코드에서처럼 on______ 뒤에는 자바스크립트 문법이 와야한다.
<!DOCTYPE html>
<html lang="en">
<head>
    <meta charset="UTF-8">
    <title></title>
</head>
<body>
    <input type="button" value="hello" onclick="alert('Hello')">
</body>
</html>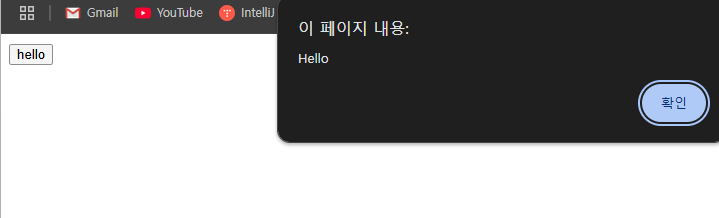
제어할 태그 선택하기
'querySelector()', 'getElementById()' 등을 사용해서 내가 제어할 태그를 선택할 수 있다.
<!DOCTYPE html>
<html>
    <head>
        <title>BLOG - git & github</title>
        <meta charset="utf-8">
        <link rel="stylesheet" href="style.css">
    </head>

    <body>
        <h1>
            <a href="index.html">BLOG</a>
            <span>
                <button>night</button>
                <button>day</button>
            </span>
        </h1>

        <div id="grid">
            <ol>
                <li><a href="1.html">http</a></li>
                <li><a href="2.html">API & REST API</a></li>
                <li><a href="3.html">Git & Github</a></li>
            </ol>
            <div id="text">
                <p> 개발자라면 깃과 깃허브에 대해서 알고 있을 것이다. 써본 적도 있고 알고는 있는데 뭔가 제대로 알고 쓰는 거 같은 느낌이 들지 않아 유튜브에 있는 유노코딩 님의 강의를 보았다. 깃을 모르는 초보자들이나 나처럼 대충 알고 쓰고 있던 사람들이 아주 보기 좋도록 잘 정리되어 있고 도움이 많이 되었다. 그래서 해당 내용을 정리하고자 공부한 내용과 영상 내용을 요약하여 글로 남겨볼까 한다. (해당 글 안에 내용들의 출처는 유노코딩님으로, 강의 내용들을 요약한 것이다.)<br><br><a href="https://youtu.be/PwIei1tdHSU?si=2hphqG_O8tWuhLbE" target="_blank">유노코딩님의 강의 링크</a><br><br> 우선 강의에서 알려주는 깃과 깃허브, 브랜치 등 주요 내용들을 먼저 정리하고, 그에 관한 명령어들을 한 번에 정리하는 식으로 글을 작성하려 한다.</p>
                <h2>git에 관한 주요 내용 정리</h2>
                <h3><a href="https://zerofootblog.tistory.com/4" target="_blank" title="git specification">깃(Git)이란?</a></h3>
                <p> 깃은 소규모 프로젝트에서 초대형 프로젝트에 이르기까지 모든 것을 신속하고 효율적으로 처리하도록 설계된 오픈 소스 버전 제어 시스템이다. (쉽게 생각하면 우리가 컴퓨터에 설치하는 다양한 종류의 소프트웨어 중 한 가지이다.)</p>
            </div>
        </div>
    </body>
</html>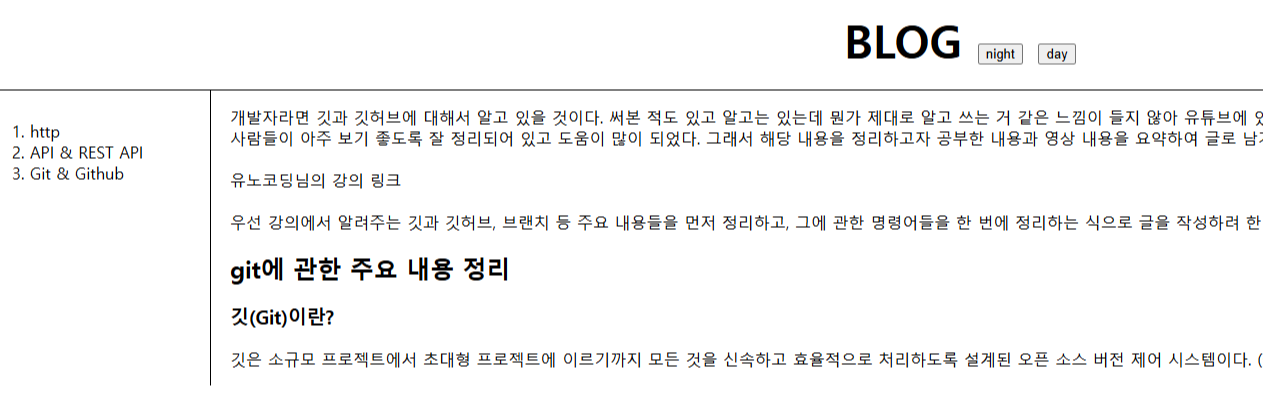
해당 코드는 간단한 블로그 화면을 만들어본 것인데, 위에 night와 day버튼을 눌렀을때, 다크모드와 라이트모드로 각각 변할 수 있게 자바스크립트 코드를 넣어볼 것이다.
<!DOCTYPE html>
<html>
    <head>
        <title>BLOG - git & github</title>
        <meta charset="utf-8">
        <link rel="stylesheet" href="style.css">
    </head>

    <body>
        <h1>
            <a href="index.html">BLOG</a>
            <span>
                <button onclick="
                document.querySelector('body').style.backgroundColor='black';
                document.querySelector('body').style.color='white';
                ">night</button>
                <button onclick="
                document.querySelector('body').style.backgroundColor='white';
                document.querySelector('body').style.color='black';
                ">day</button>
            </span>
        </h1>

        <div id="grid">
            <ol>
                <li><a href="1.html">http</a></li>
                <li><a href="2.html">API & REST API</a></li>
                <li><a href="3.html">Git & Github</a></li>
            </ol>
            <div id="text">
                <p> 개발자라면 깃과 깃허브에 대해서 알고 있을 것이다. 써본 적도 있고 알고는 있는데 뭔가 제대로 알고 쓰는 거 같은 느낌이 들지 않아 유튜브에 있는 유노코딩 님의 강의를 보았다. 깃을 모르는 초보자들이나 나처럼 대충 알고 쓰고 있던 사람들이 아주 보기 좋도록 잘 정리되어 있고 도움이 많이 되었다. 그래서 해당 내용을 정리하고자 공부한 내용과 영상 내용을 요약하여 글로 남겨볼까 한다. (해당 글 안에 내용들의 출처는 유노코딩님으로, 강의 내용들을 요약한 것이다.)<br><br><a href="https://youtu.be/PwIei1tdHSU?si=2hphqG_O8tWuhLbE" target="_blank">유노코딩님의 강의 링크</a><br><br> 우선 강의에서 알려주는 깃과 깃허브, 브랜치 등 주요 내용들을 먼저 정리하고, 그에 관한 명령어들을 한 번에 정리하는 식으로 글을 작성하려 한다.</p>
                <h2>git에 관한 주요 내용 정리</h2>
                <h3><a href="https://zerofootblog.tistory.com/4" target="_blank" title="git specification">깃(Git)이란?</a></h3>
                <p> 깃은 소규모 프로젝트에서 초대형 프로젝트에 이르기까지 모든 것을 신속하고 효율적으로 처리하도록 설계된 오픈 소스 버전 제어 시스템이다. (쉽게 생각하면 우리가 컴퓨터에 설치하는 다양한 종류의 소프트웨어 중 한 가지이다.)</p>
            </div>
        </div>
    </body>
</html>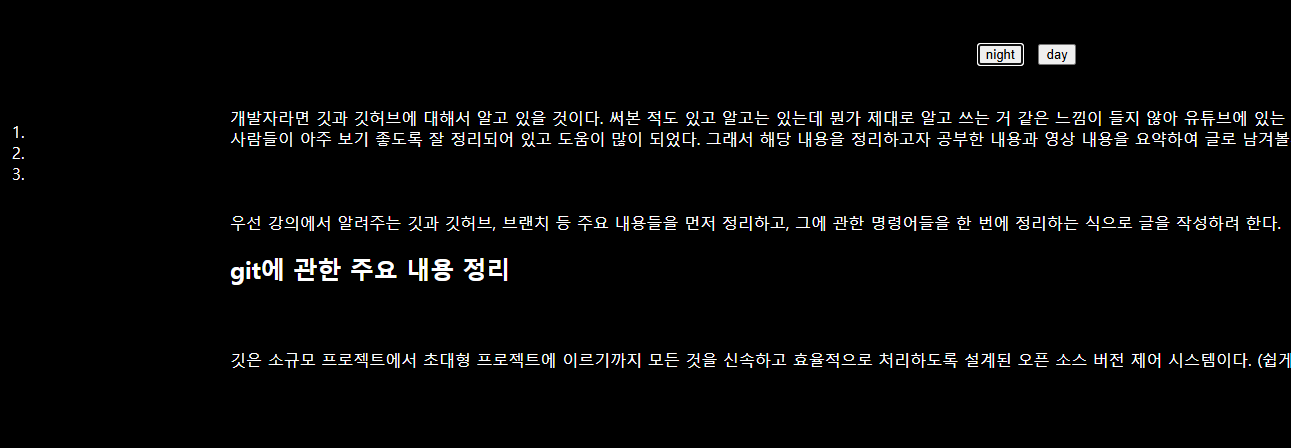
'querySelector'를 이용한 자바스크립트 코드를 통해 night버튼을 눌렀을 때, body태그의 백그라운드 컬러와 글씨 색을 변경할 수 있도록 만들었다. 하지만 a태그에는 css 효과가 따로 적용되어 있었기 때문에 우선 순위가 밀려 적용이 되지 않았다. 그러면 따로 a태그도 선택해서 효과를 주어야 하는데
<!DOCTYPE html>
<html>
    <head>
        <title>BLOG - git & github</title>
        <meta charset="utf-8">
        <link rel="stylesheet" href="style.css">
    </head>

    <body>
        <h1>
            <a href="index.html">BLOG</a>
            <span>
                <button onclick="
                document.querySelector('body').style.backgroundColor='black';
                document.querySelector('body').style.color='white';
                document.querySelector('a').style.color='white';
                ">night</button>
                <button onclick="
                document.querySelector('body').style.backgroundColor='white';
                document.querySelector('body').style.color='black';
                document.querySelector('a').style.color='black';
                ">day</button>
        </h1>
        <!-- 생략 -->
보는 것과 같이 h1안에 있는 a태그는 변경이 됐지만, ol 태그 안에 있던 3개의 a태그는 변경이 안됐다. 그 이유는 'querySelector'는 선택한 태그의 오직 첫번째 태그만 적용이 되기 때문이다. 여러개의 a태그를 선택하기 위해서는 'querySelectorAll'을 사용해야 한다.
<!DOCTYPE html>
<html>
    <head>
        <title>BLOG - git & github</title>
        <meta charset="utf-8">
        <link rel="stylesheet" href="style.css">
    </head>

    <body>
        <h1>
            <a href="index.html">BLOG</a>
            <span>
                <button onclick="
                document.querySelector('body').style.backgroundColor='black';
                document.querySelector('body').style.color='white';

                document.querySelectorAll('a').forEach(list => {
                    list.style.color='white';
                })
                ">night</button>
                <button onclick="
                document.querySelector('body').style.backgroundColor='white';
                document.querySelector('body').style.color='black';

                document.querySelectorAll('a').forEach(list => {
                    list.style.color='black';
                })
                ">day</button>
        </h1>
        <!-- 생략 -->
이와같이 정상적으로 모두 적용되는 것을 볼 수 있다.
'===' or '==' ?
동등 비교 연산자인 '=='은 값이 같으지만 비교를 하고, '==='은 값과 데이터 타입까지 같으지 비교한다.
var, let, const ?
세 가지 모두 javascript에서 변수를 선언할 때 사용되는 키워드이다. 여러가지 특성들이 있지만 요약하자면
- var : 가능하면 쓰지 않기
- let : 값이 변하는 변수를 선언할 때 사용하기
- const : 값이 변하지 않는 변수를 선언할 때 사용하기
객체
- 객체 선언
<!DOCTYPE html>
<html lang="en">
<head>
    <meta charset="UTF-8">
    <title></title>
</head>
<body>
    <h1>Object</h1>
    <script>
        const numbers = {
            "one" : "1",
            "two" : "2",
        }
        document.write("one : " + numbers.one + "<br>");
        document.write("two : " + numbers.two)
    </script>
</body>
</html>
- 객체 추가
<!DOCTYPE html>
<html lang="en">
<head>
    <meta charset="UTF-8">
    <title></title>
</head>
<body>
    <h1>Object</h1>
    <script>
        const numbers = {
            "one" : "1",
            "two" : "2",
        }
        document.write("one : " + numbers.one + "<br>");
        document.write("two : " + numbers.two + "<br>");
        numbers.three = "3";
        document.write("three : " + numbers.three + "<br>");
        numbers["number four"] = "4";
        document.write("four : " + numbers["number four"] + "<br>");
    </script>
</body>
</html>
'number four'와 같은 경우에는 중간에 띄어쓰기가 포함되어 있기 때문에 ' numbers["number four"] = "4" '라는 식으로 코딩을 해야한다.
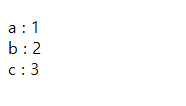
for...in 과 for...of
for...in은 주로 객체의 속성(키)을 반복할 때, for...of는 배열, 문자열, Set, Map과 같은 이터러블 객체를 반복할 때 사용한다.
- for...in
const obj = { a: 1, b: 2, c: 3 };

for (let key in obj) {
	document.write(key + " : " + obj[key] + "<br>");
}
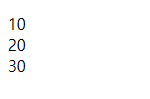
- for...of
const arr = [10, 20, 30];

for (let value of arr) {
  document.write(value + "<br>");
}
객체에 함수 선언해서 사용하기
객체 안에 함수를 선언해서 코드를 더 간략하게 만들 수 있다.
const Body = {
    setColor:function(color) {
        document.querySelector('body').style.color = color;
    },
    setBackgroundColor:function(color) {
        document.querySelector('body').style.backgroundColor = color;
    }
}
const Links = {
    setColor:function(color) {
        const alist = document.querySelectorAll('a');
        let i = 0;
        while(i < alist.length) {
            alist[i].style.color = color;
            i++;
        }
    }
}
const Borders = {
    setColor:function(color) {
        document.querySelector('#grid ol').style.borderRight = `1px solid ${color}`;
        document.querySelector('h1').style.borderBottom = `1px solid ${color}`;
    }
}
function nightDayHandler(self) {
    if(self.innerText === 'night'){
        Body.setColor('white');
        Body.setBackgroundColor('black');
        self.innerText = 'day';

        Links.setColor('white');

        Borders.setColor('white');
    } else {
        Body.setColor('black');
        Body.setBackgroundColor('white');
        self.innerText = 'night';

        Links.setColor('black');

        Borders.setColor('black');
    }
}
<!DOCTYPE html>
<html>
    <head>
        <title>BLOG - git & github</title>
        <meta charset="utf-8">
        <link rel="stylesheet" href="style.css">
        <script src="color.js"></script>
    </head>

    <body>
        <h1>
            <a href="index.html">BLOG</a>
            <span>
                <button onclick="nightDayHandler(this)">night</button>
            </span>
        </h1>
        <div id="grid">
            <ol>
                <li><a href="1.html">http</a></li>
                <li><a href="2.html">API & REST API</a></li>
                <li><a href="3.html">Git & Github</a></li>
            </ol>
            <div id="text">
                <p> 개발자라면 깃과 깃허브에 대해서 알고 있을 것이다. 써본 적도 있고 알고는 있는데 뭔가 제대로 알고 쓰는 거 같은 느낌이 들지 않아 유튜브에 있는 유노코딩 님의 강의를 보았다. 깃을 모르는 초보자들이나 나처럼 대충 알고 쓰고 있던 사람들이 아주 보기 좋도록 잘 정리되어 있고 도움이 많이 되었다. 그래서 해당 내용을 정리하고자 공부한 내용과 영상 내용을 요약하여 글로 남겨볼까 한다. (해당 글 안에 내용들의 출처는 유노코딩님으로, 강의 내용들을 요약한 것이다.)<br><br><a href="https://youtu.be/PwIei1tdHSU?si=2hphqG_O8tWuhLbE" target="_blank">유노코딩님의 강의 링크</a><br><br> 우선 강의에서 알려주는 깃과 깃허브, 브랜치 등 주요 내용들을 먼저 정리하고, 그에 관한 명령어들을 한 번에 정리하는 식으로 글을 작성하려 한다.</p>
                <h2>git에 관한 주요 내용 정리</h2>
                <h3><a href="https://zerofootblog.tistory.com/4" target="_blank" title="git specification">깃(Git)이란?</a></h3>
                <p> 깃은 소규모 프로젝트에서 초대형 프로젝트에 이르기까지 모든 것을 신속하고 효율적으로 처리하도록 설계된 오픈 소스 버전 제어 시스템이다. (쉽게 생각하면 우리가 컴퓨터에 설치하는 다양한 종류의 소프트웨어 중 한 가지이다.)</p>
            </div>
        </div>
    </body>
</html>'공개 글' 카테고리의 다른 글
| static (2) | 2025.05.02 |
|---|---|
| 트랜잭션(Transaction) (0) | 2025.04.28 |
| Web Server와 WAS (1) | 2025.03.17 |
| CSS 기본 - 2 (0) | 2025.03.13 |
| CSS 기본 - 1 (1) | 2025.03.12 |